For the Cinematographer
Shoot the KODAK Gray Card / R27 in each new lighting setup. The KODAK Gray Card / R27 should occupy at least 15% of the frame in all cases, and if possible, a larger portion of the frame. The larger the card area, the easier it is for the Colorist to obtain the readings needed for exposure and grading reference.
For Transfer Grading and Film Timing
- provides a transfer and printing reference for normal lighting and exposure.
- serves as a guide to preserve special lighting and exposures.
- indicates corrections needed to improve color balance and exposure.
- establishes a starting point for scenes to be transferred or printed for special effects.
For Standard Exposure Evaluation
- enables the transfer facility to determine transfer points similar to printer points from a film lab.
Shooting the KODAK Gray Card / R27
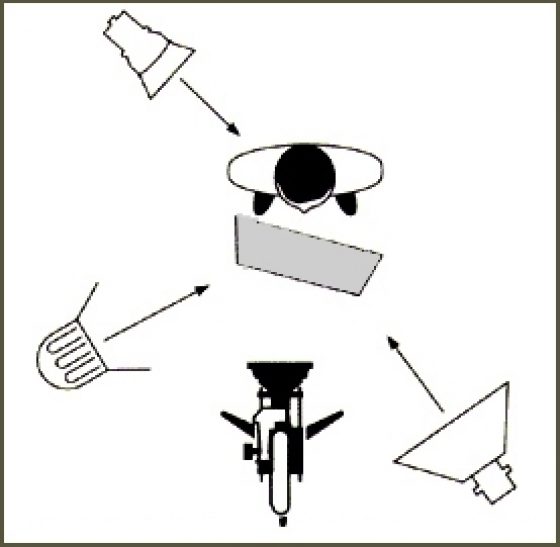
When the card is shot as part of the scene it should...
- be placed near the main subject to represent the general lighting.
- occupy at least 15% of the frame.
- provide an accurate reference for color and exposure when graded to 18% neutral grey.
- Position the card so it receives the same light (intensity and color balance) as the main subject and occupies at least 15% of the frame. Zoom or move in, if necessary.
- Turn or tilt the card so it is evenly illuminated without shadows or flare. The color temperature of the light reflected from the card should match the scene.
- Determine normal exposure for the scene using an incident light meter or the method you prefer.
- Take a reflected spotmeter reading on the grey portion of the card from the camera position. If necessary, reposition the card or add supplemental light for a reading that agrees with the aperture you have chosen for normal exposure.
- Shoot the card including some of the scene for practical reference.
- Repeat this procedure at the head of each roll and every time there is a major lighting change.
Note: Shooting the card in the scene will not preserve special lighting or exposure. The colorist or timer is instructed to always grade the card to 18% neutral, then use that setup as a strong starting point for final grading. To maintain special or altered lighting in the transfer or print, always shoot the card in the alternate position.
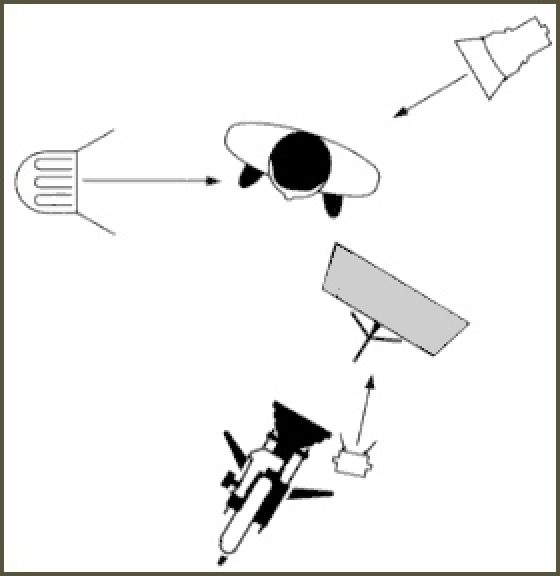
Shoot the card in this alternate position when...
- placing the card in the scene will not provide an accurate grading or exposure reference.
- the card cannot reflect the main light of the scene and occupy at least 15% of the frame.
Examples: strong cross lighting or backlit scenes; wide shots or long exteriors where the card would be lost in the scene.
- Place the card on an easel or other support near the camera. Make sure the light on the card is even and flat. Generally, one wide-beam lighting unit placed near the camera lens is sufficient.
- Tilt the card, if necessary, for even reflectance. The color balance and exposure on the card should match the color exposure of the scene.
Exception: when the card is to serve as a grading reference for special lighting. (See Darker or Lighter Grading and Special Lighting and Exposure Control .) - Take a reflected light reading on the grey portion of the card from the camera position. Select a lens aperture that will make the card a valid reference for grading and/or exposure evaluation. (See the instructions on using the card below.)
- Shoot a few feet of the card (close-up) immediately preceding the scene it references and for every major lighting change. If possible, pull or zoom back and shoot the card a second time including some of the scene for practical reference.
Using the KODAK Gray Card / R27 for Transfer Grading and Film Timing
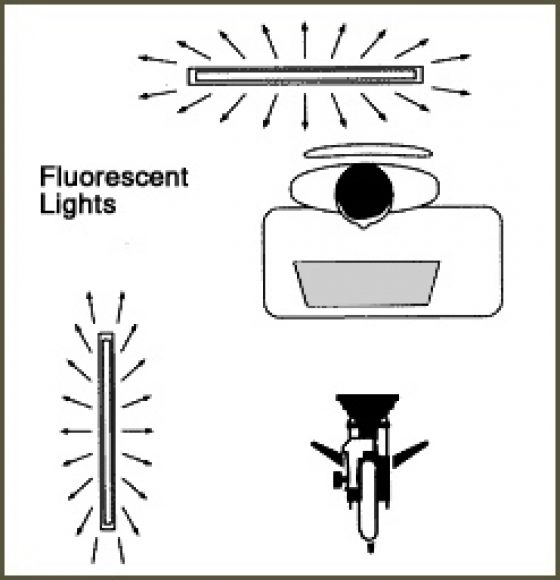
Normal Exposure and Color Balance
Normal color balance is 3200°K tungsten; 5600°K daylight.
- Follow the instructions for shooting the card as part of the scene or in the alternate position.
- Shoot the card at the same aperture and color temperature as the scene.
Color Correction
When the lighting does not match the color balance of the film.
Example: shooting under fluorescent or warm tungsten light without correction filters.
- Make certain the card receives the same light (color and intensity) as the scene to be shot. If necessary, light the card separately as described under alternate position, maintaining the same dominant color balance of the main scene.
- Shoot the card in the scene or immediately preceding the scene it references. When the shot with the card is graded to a neutral grey, the scene(s) following will be corrected for a more normal color balance.
Note: If you shoot with color correction filters on the camera or the lights to help balance the scene, make sure you shoot the card under the same filtration. If you are using color filters on the camera or lights for special effects, do not shoot the card using these filters. Your special lighting will be lost when the scene is graded for a neutral grey card.
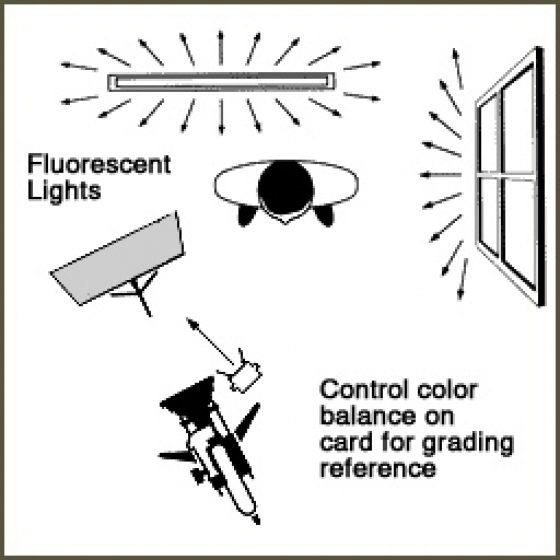
Mixed Lighting
When lighting consists of different color temperatures.
Example: a combination of daylight, fluorescent or tungsten light.
- Read the color temperature of the various areas in the scene.
- Determine the color temperature of the area which is visually most dominant.
- Shoot the card in this area as a reference for the color correction needed in the transfer or print.
OR
- Determine the average color temperature in the scene.
- Using the alternate position, light the card for this color temperature. (If necessary, use separate light[s] with voltage control to achieve the desired color balance on the card.)
When the shot of the card is graded to a neutral grey, the scene(s) following will be corrected for a warmer or cooler color balance as determined by the light on the card.
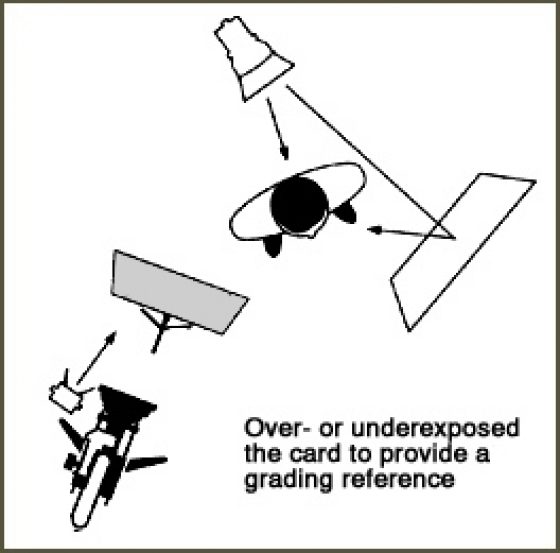
Darker or Lighter Grading Normal Exposure
When the scene is to be graded darker or lighter.
Examples: day-for-night scenes shot at normal exposure; a scene to be transferred or printed two stops darker.
- Shoot the scene at a normal exposure to provide a full-range negative.
- Instead of shooting the card at the normal aperture, overexpose the card if you want the scene darkened. Underexpose the card if you want the scene lightened. The amount the card is over or underexposed will provide a grading reference for the way the scene is to be transferred or printed.
- To maintain colored lighting, make sure you shoot the card under "white light" (light balanced for the film). This will preserve your special lighting when the card is timed to a neutral grey.
Special Lighting and Exposure Control
When non-standard lighting and exposures are to be maintained in the print or transfer.
Examples: scenes intentionally over or underexposed; colored lighting and other special effects.
- Light the scene and determine your exposure for the desired effect.
Example: light for T-2.8 with colored gels; shoot at T-4 for one-stop underexposure. - Using the alternate position, light the card with "white light" balanced for the film.
- Take a reflected reading from the camera position and shoot the card at an aperture that will provide a normal grey card exposure, in this case T-2.8.
- Shoot the scene at the aperture you've chosen for under or overexposure.
When the card is graded to 18% neutral grey, and this grading is maintained for the scene that follows, your special lighting and exposures should be maintained.
Note: If you light the scene with a wide mix of colors in which there is no one dominant source - fire, smoke, heavy gels - shoot the card in the alternate position under "white light" (balanced for the film) to maintain your special; lighting. If possible, include some of the scene with the card for practical reference.
Using Filters and the KODAK Gray Card / R27
- If you are using filters on the camera or on a light source for color compensation (e.g., Kodak Wratten 85 filter on the lens or gel on a window), shoot the card with the filter(s) in place.
- If you are using filters on the lights to create a special effect, shoot the card with "white light" (balanced for the film) to preserve the effect.
- Remember to take the filter factor (FF) into account when the filter is on the camera, or you may underexpose the scene.
Here's a simple way to determine the filter factor...
- Measure the light from a single narrow source (spotlight) with an incident light meter.
- Without moving the meter, hold the filter directly in front of the sensor so that all the light reaching the meter must pass through the filter.
- Compare these two readings. The difference in t-stops will give you the filter factor.
One stop = FF 2; two stops = FF 4; three stops = FF 8, etc. - Dividing the normal exposure index (EI) of the film by the filter factor will give you the effective EI for the film with that filter on the lens.
Example: normal EI 100 FF 2 (one t-stop) = EI 50.
Based on your own experience and preference in determining proper exposure, you may sometimes choose to alter these procedures. The main thing is to be consistent, so that the colorist or timer will have a uniform reference. That way he/she can set up the transfer or select printer lights to maintain the look you worked to achieve.